
Beehive Pros and Cons – How to Choose the Best Hive for You

The 3 most common types of beehives are the Langstroth, Horizontal Top Bar, and Warre hives. The Langstroth is the most widely used model in the US and Australia today and is the best for maximum honey production. The Horizontal Top Bar is best for people who cannot lift the heavy, 50 to 100-pound bee boxes of the other hive designs, and instead, they only need to manage one comb at a time. The Warre is best for those who have less time and need a more natural, hands of approach that only requires them a few times a year. Get to know the pros and cons of each, their cost, and features to look for.
The Biggest Investment You’ll Make in Beekeeping
If you’re just getting started with beekeeping the most expensive item you will purchase is your hives. And you can’t successfully keep bees without a hive. The type of beehive you choose can make or break your experience. Unfortunately, many first-time beekeepers give up after a bad season. But if you can educate yourself you stand an excellent chance to make some mistakes, learn from them, and fall in love with the magical world of bees.
Choosing a beehive is a great place to start in educating yourself and a fun beginning to your apiary. For our beginners, an apiary is a place where your hives are stored and your bees live.
Langstroth Hives
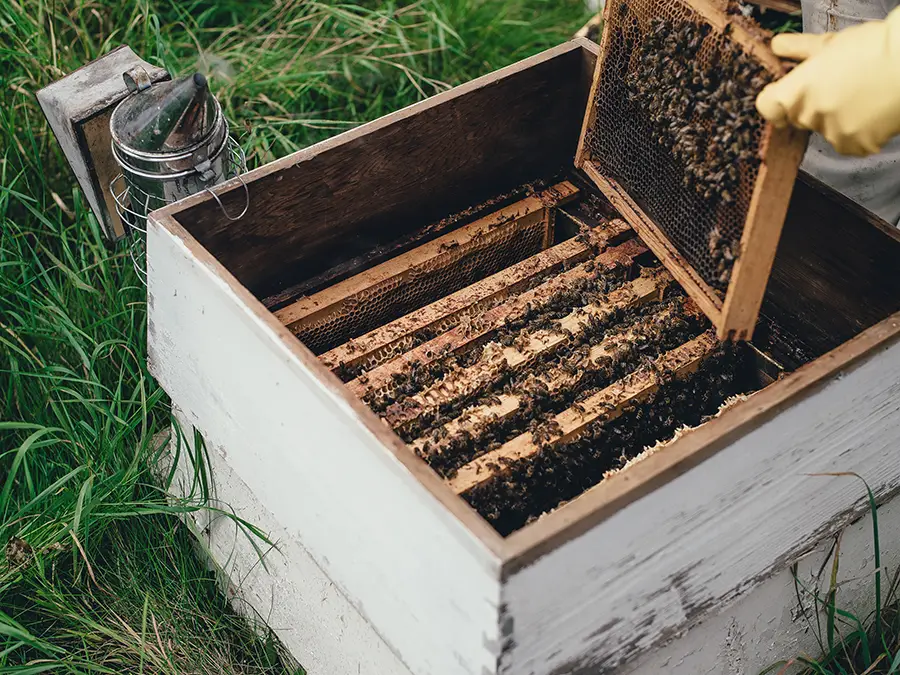
The Langstroth hive is the most common type of hive and is perfect for new beekeepers. It was invented by Rev. Lorenzo Langstroth in 1852 and today has become the most well-known modern beehive. The design is made of frames that fit into boxes, and the boxes stack on top of each other. The frames are what your bees will draw down their comb on, and fill it with brood in the lower boxes, and honey in the top boxes.
The key innovation of the Langstroth hive was his discovery of bee space. Before his discovery, beehives would become cemented together with comb and propolis and immovable. Langstroth discovered that if his bees were given a space between 6.4–9.5 mm (1⁄4–3⁄8 in), they wouldn’t close that space up with honeycomb or propolis. This allowed him to make a hive with movable frames.
Pros and Cons of the Langstroth Hive
Pros
- The most widely used hive style, so it’s easy to find hives and mentors to teach you how to use them
- Gives the best honey production and is almost exclusively used in commercial beekeeping
- Lower learning curve for beginners, especially if using foundations in the frames
- Can be added on to as needed to provide room for hives to grow without swarming
- More availability means these hives are less expensive
Cons
- Foundations used in frames are made from pesticide filled commercial beeswax or plastic
- The design uses thin walls which make it difficult to keep bees warm in very cold climates
- The bee boxes when full of honey are very heavy to lift at 50 to 100 pounds each
- Checking the hive becomes invasive for the bees since you are disturbing them more by lifting boxes
- More complex hive design makes it more difficult to build yourself
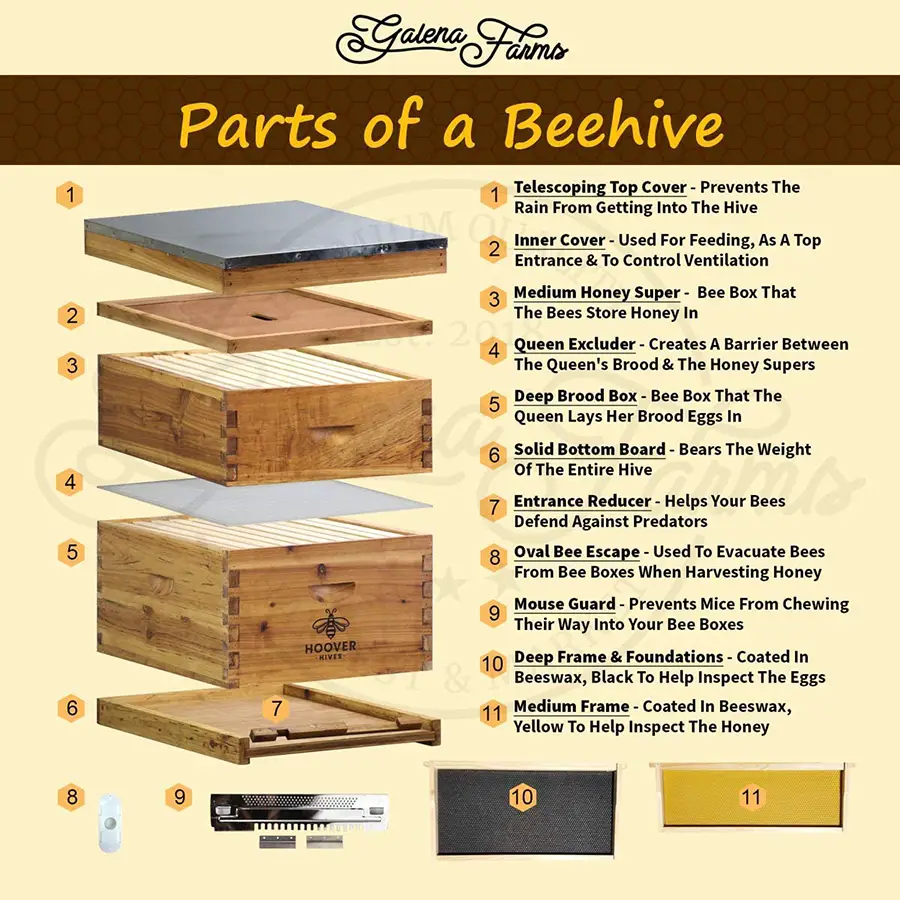
Langstroth Hive Sizes and Features
The Langstroth hive has a lot of parts and can be customized with different sizes. The width of the hive comes in an 8-frame or 10-frame size. If you’re concerned about heavy boxes, you can choose the 8-frame, but if you want maximum honey output per hive, choose the 10-frame.
The base of the Langstroth hive is also called the bottom board where your bees will enter and exit the hive, so there should be a landing platform for them to use. Langstroth hives often come with an entrance reducer with multiple sizes that can be helpful to minimize the amount of airflow into the hive in the winter. Entrance reducers can also be helpful because a two to three-inch space is what the bees prefer in nature. It means they won’t need as many dedicated guard bees for their entrance and can spend more time doing what they do best.
The bottom board comes in a solid wood version or a metal screened version with a removable corrugated plastic bottom. If you live in a very cold climate, you will want the solid wood version to help keep your hive insulated and warm in the winter. If you live in a humid climate, you will want the screened version to allow moisture to escape your hive and prevent hive diseases. Many beekeepers keep both types of foundations and change them out depending on the season.
The boxes of the Langstroth hive come in heights of shallow, medium, and deep. Some beekeepers looking to cut down on weight will use two shallow boxes that they lift on top, and one deep box they don’t need to lift on the bottom. The frames that come in the different depths of boxes are sized accordingly so you couldn’t use a deep frame in a small or medium box. Beekeepers who are looking to make their frames interchangeable will choose all medium boxes.
The deep box is also called the brood box since that is where the Queen will lay her brood. It is also referred to as the hive body or deep body. You will have one to two deep boxes in your hive that stay on the bottom of your stack. It is good to overwinter with two deep boxes to give your bees enough space to store food to get them through winter when they can’t find nectar. One deep box can be up to 100 pounds and are 9 ⅝ inches deep.
Both the medium and the shallow boxes are referred to as the honey super since these boxes are where the worker bees will make their honey, particularly in the spring and fall or whenever nectar flows in your area. Super refers to its placement above the brood. If honey boxes are placed below the brood as they are with Warre hives, it is referred to as nader.
This is the honey you will harvest for yourself, while the honey in the brood boxes where the queen lives is to feed your bees. The Medium is 6 ⅝ inches deep and about 55 pounds when full. The shallow is 5 ¾ inches deep and about 40 pounds when full.
The queen excluder is a metal or plastic mesh piece that sits between the brood box and the honey supers. It is sized so the larger queen cannot pass through, but worker bees can. This has the advantage of keeping brood out of the honey you harvest and makes it easier to locate your queen. Some beekeepers have found queen excluders lead to lower honey production and a short lifespan of worker bees. A Queen excluder is a matter of preference and is optional.
The frames of the Langstroth hive can come with, or without a foundation. Frames are just like they sound, 4 sided wooden frames where the bees will build, or draw down their comb, which they fill with brood or baby bees, and nectar which they dehydrate and turn into honey.
Foundations are usually used because they give the bees a plastic, or wax-covered foundation to build their combs on. Without foundation, the comb can be more fragile and more difficult to harvest honey with an extractor. Bees tend to not build straight combs and will connect them to each other, called cross-combing, which can lead to a real mess in your hive.
The major downside to the use of foundations is they are made from pesticide-laden commercial beeswax and can lead to more susceptibility to disease in your hive. Natural beekeepers using Langstroth hives won’t use foundations and instead will help create comb guides on their frames with wire or wooden skewer sticks. They will also need to check their hives weekly to redirect any cross-combing before it becomes a big problem.
The inner cover sits on top of the top honey super and is solid wood with an oval-shaped cutout in the middle. This cutout allows bees to enter, helps control ventilation, and can be used to attach a feeder if needed. The telescoping top cover sits on the very top of the Langstroth hive stack and acts as a roof, keeping rain, wind, and snow out, and helping to insulate the hive.
A Langstroth hive starter kit can often be bought for around $200 and is an excellent choice for most beginners. Unless you have lifting restrictions, have very minimal time, or live in an exceptionally cold climate, the Langstroth will make a great hive for you.
Horizontal Top Bar Hive
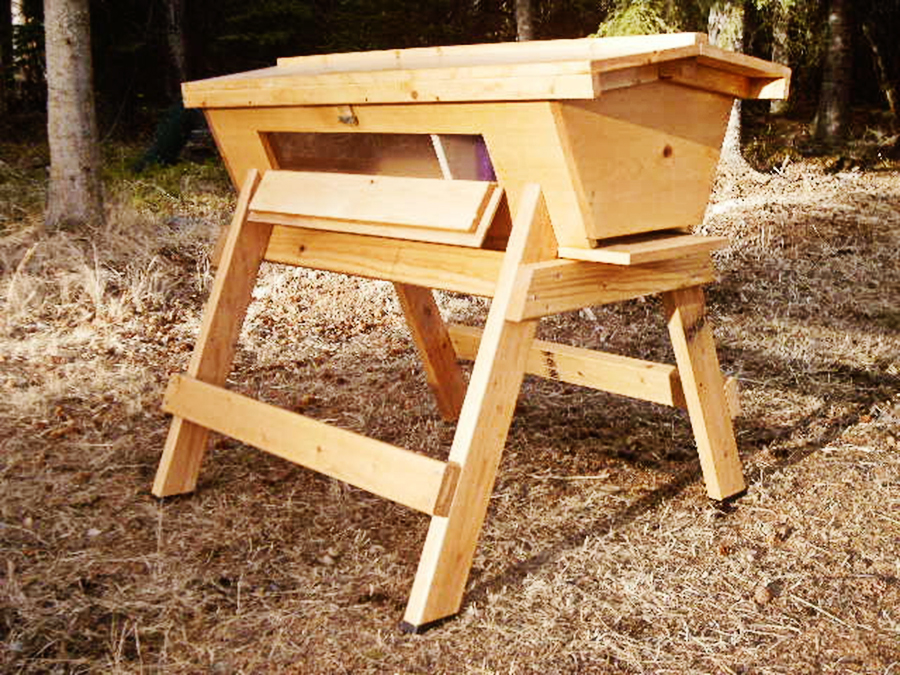
The Horizontal Top Bar or Top Bar hive is the oldest and most commonly used style in the world. Its simple design of a box with individual bars laid across the top makes it easy to construct and accessible throughout the world. Instead of frames, bees draw down their comb from the bars simple guide at the top. Modern designs even include observation windows.
There is evidence of Top Bar hive use in ancient Greece with a simple terra cotta pot laid with sticks on top. The Horizontal Top Bar hive is also known as the Kenyan Top Bar hive which was developed by a Canadian researcher in Kenya.
Pros and Cons of the Top Bar Hive
Pros
- Simple design makes them easy to build and manage
- Bees are more docile during inspection since only one comb is disturbed at a time
- A more natural method without the use of pesticide-contaminated commercial wax foundations, and may help lower mite infestations
- Once set up, doesn’t require heavy lifting
- Simple honey harvesting using the crush and strain method
Cons
- Needs to be checked more often to prevent cross combing
- Empty bars need to be added regularly between brood comb to prevent swarming
- Combs are more fragile and cannot be turned at certain angles
- Not as common so it can be harder to find mentoring
- 20% reduce honey production compared to the Langstroth hive
- Fixed-size so you can’t add a brood box when it’s full, instead, you’ll need to split the hive early before the nectar flow
Horizontal Top Bar Hive Features
In a Horizontal Top Bar hive, the bees will naturally separate the brood from the honey. The queen will lay the brood on the comb closest to the hive entrance, and the worker bees will make honey at the other end.
One of the unique optional features of a Top Bar hive is a solid wooden divider bar, also called a follower, which can effectively be used to shrink and grow the chamber of the hive depending on the season and your bee’s needs. When you first introduce a bag of bees, also called a nuc, or a natural swarm to a Top Bar hive you can keep the chamber smaller, with about 8 to 10 bars near the entrance, followed by your follower board and then the rest of your bars. As the bees build out the comb you can move the follower back and add more bars. After honey harvest when you winter your beehive, you can use the follower to shrink the hive and create a smaller space for the bees to keep warm.
As your bees draw out comb with brood, you’ll want to checkerboard your top bars by placing a new bar in-between filled bars. This can help keep the comb more straight and cut down on cross-combing. Once the bees have finished laying enough brood, then they will start making combs with just honey in them.
Another feature you can look for in a Top Bar hive is ¼ inch spacers between your honey bars, or get honey bars that are ¼ inch wider than your brooder bars. Bees will naturally draw out brood comb that is 1 ⅜ inch wide (normal bee space), and honeycomb that is 1 ⅝ inch wide. This spacing encourages good alignment of your honeycomb.
Harvesting honey is very simple in a Top Bar hive. You simply use your hive tool to remove any comb that is attached to the sidewalls of the hive, then cut it from the bar, and use a crush and strain method to extract your honey. You will be left with plenty of honey and beeswax.
While the Langstroth hive requires more education about its many features the Top Bar Hive requires more education on its management. This has been a good summary in choosing a beehive, but I highly recommend reading a Horizontal Top Bar book by a seasoned expert if you plan to use this style of beehive. My favorite book is this nearly 400-page book by Philip Chandler.
The typical Hortizonatal Top Bar hive will run you about $400-500, or you can build one for around $100. They are a fairly simple design and easy to make.
The Warre Hive
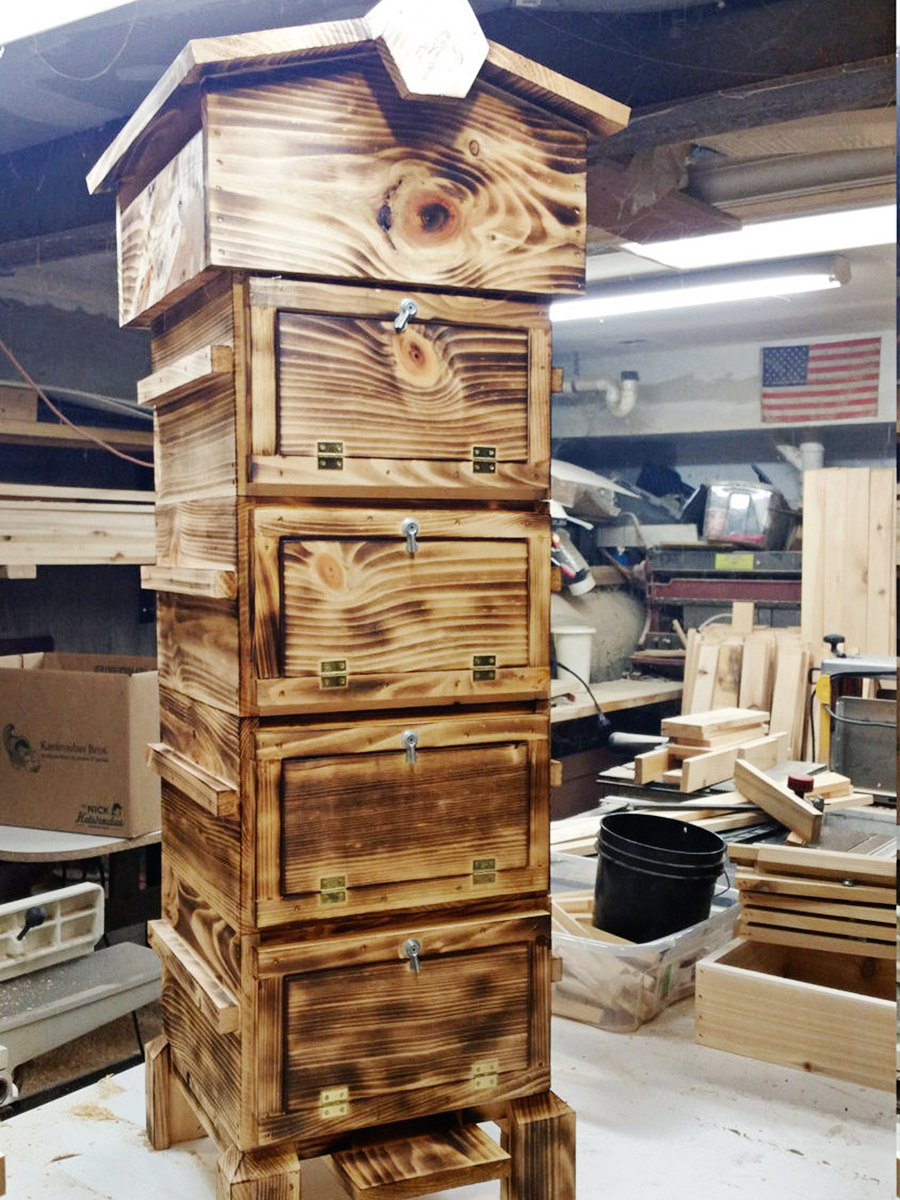
The Warre hive was developed by a French priest and beekeeper Emile Warre in the early 1950s after 50 years of research on hive designs and beekeeping. Warre’s philosophy was that beekeepers should handle the bees as little as possible—only a few times per year. And that handling should be done box by box rather than frame by frame.
The Warre hive is a stacking style hive similar to the Langstroth hive, but with bars like the Top Bar instead of frames. Instead of adding new boxes to the top as you would in the Langstroth, you add them to the bottom in the Warre hive. He called it “The People’s Hive” because he wanted a design that was simple enough for anyone to build and use.
Pros and Cons of the Warre Hive
Pros
- Great for busy people who only need to check the hive a few times per year
- Designed to simulate bees in their natural environment using all-natural materials
- The thick walls and top quilt box are designed for maximum insulation with minimum moisture in the hive, which helps keep the bees free from wax moths and parasites
- Viewing windows can be added to modern Warre hives
Cons
- Since additional boxes are stacked below, called nadiring, you have to lift all the pieces off and it’s very heavy
- Produces less honey that the Top Bar or Langstroth hive
- The most uncommon of the three beehive styles so it will be more difficult to find support
Warre Hive Features
Warre’s method was to add empty boxes to the bottom of the hive in the spring and remove honey-filled boxes from the top in the fall. The Warre hive boxes are all the same size and have a depth that is in between and medium and deep Langstroth box. The Warre boxes are made with handles so they are easier to move.
The top bars in the Warre hive are very similar to the bars in the Top Bar hive. They are frameless and wedge-shaped with wax starter strips to aid in straighter combs without the use of chemical-laden foundations.
A weave cloth is laid flat on the top box to prevent bees from accessing the top and make sticky removal of the box easy. On top of the weave cloth sits a quilt box, which is a simple open box covered with cloth and filled with straw, sawdust, or wood shavings. This quilt box allows excess moisture that can make bees sick to rise to the top and be absorbed and then evaporate out the top of the hive. The hive is finished with a mouse-proof top board and a gabled, telescoping roof to keep snow and rain out of the hive.
Warre hives sell for between $200 to $500, or you can also make one since the plans were designed to be fairly simple. The “People’s Hive” is perfect for you if you’d like a natural hands-off approach and aren’t looking to make a profit as a bee farmer.
What about you, what experiences have you had with these three different hives? Share your own personal pros and cons in the comments below.
Leave a Reply